
TL;DR:
- Effective post-construction cleaning requires specialized HEPA equipment and a phased top-to-bottom process. Waiting 24 to 48 hours before the final clean allows airborne dust to settle completely. Professionals use this method to ensure a thorough, safe transition from construction zone to livable space.
By L.K. | Themaidsociety | Updated 2026
Table of Contents
- What tools and protective gear you need
- What are the phases of post-construction cleaning
- How to clean post-construction dust step-by-step
- How to troubleshoot common challenges
- Key Takeaways
- Perspective
- Professional help in Southern California
- FAQ
Post-construction dust is defined as the fine particulate matter left behind after any building, remodeling, or renovation work, and it requires a structured, phased cleaning process to remove safely and completely. Knowing how to clean post-construction dust means more than running a mop across the floor. Fine particles from drywall, silica, and concrete stay airborne for days before settling on every surface in your home. Standard vacuums and dry dusting spread these particles further rather than capturing them. The right approach uses commercial-grade HEPA-filter vacuums, microfiber cloths, and a strict top-to-bottom sequence. Homeowners and renters in Los Angeles, Santa Monica, Beverly Hills, and across Southern California deal with this after kitchen remodels, bathroom renovations, and full home builds alike. This guide gives you the exact process professionals use, from the first rough sweep to the final inspection-ready polish.
What tools and protective gear you need {#tools}
The right equipment separates a successful post-construction cleanup from one that just moves dust around. Before you touch a single surface, gather everything on this list.
Vacuums and dust capture tools:
- A HEPA-filter vacuum is non-negotiable. HEPA filters capture 99.97% of particles down to 0.3 microns, which means they trap the fine silica and drywall dust that standard vacuums blow back into the air. The Sabezon VacuumPilot™ Cordless Stick Vacuum is a solid option for homeowners who want maneuverability without sacrificing filtration quality.
- Microfiber cloths in multiple sizes for walls, trim, and fixtures
- Soft-bristle brushes for vents, grilles, and textured surfaces
- An electrostatic duster for light fixtures and ceiling fans
Cleaning agents:
- pH-neutral all-purpose cleaner for painted walls and sealed floors
- Adhesive remover or Goo Gone for sticker residue and protective film
- Grout haze remover for tile work (non-abrasive formula only)
Personal protective equipment (PPE):
- N95 or P100 respirator to filter fine particulate matter during active cleaning
- Safety goggles to protect eyes from airborne debris
- Nitrile gloves to protect skin from dust and chemical cleaners
Pro Tip: Buy at least two dozen microfiber cloths before you start. You will go through them faster than you expect, and reusing a dust-saturated cloth just redistributes particles onto clean surfaces.

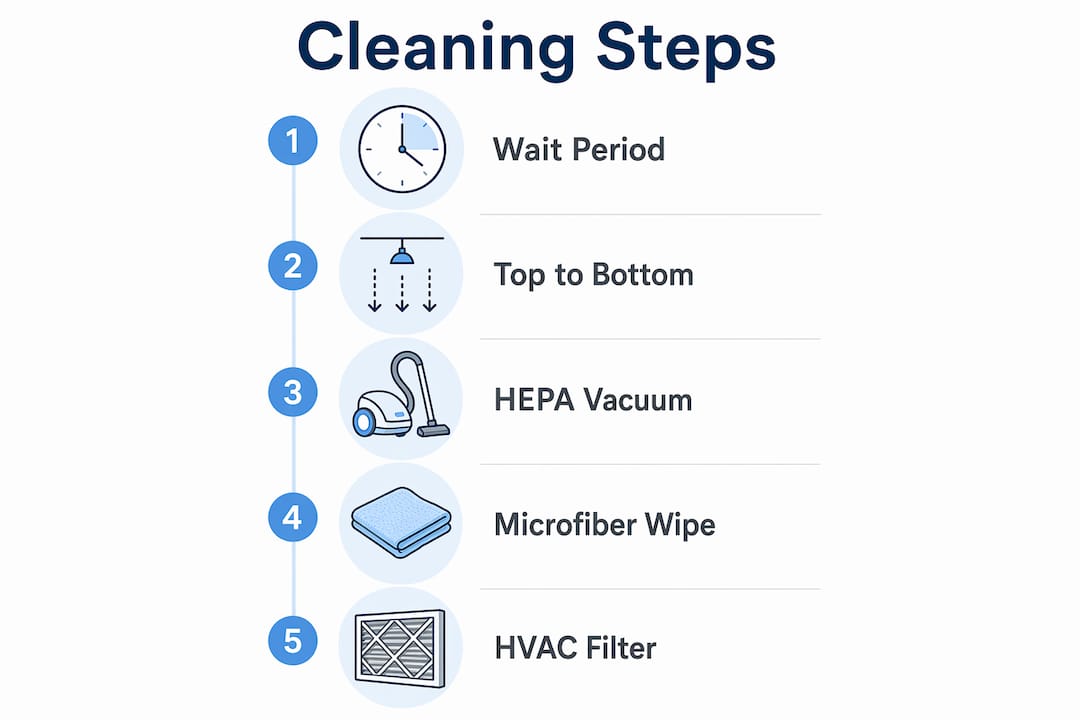
What are the phases of post-construction cleaning and why follow this order {#phases}
Post-construction cleaning, known in the industry as “construction site cleanup” or “builder’s clean,” follows three distinct phases. Skipping or combining phases forces you to redo work and can leave hazardous fine dust in your living space.
-
Rough clean. This phase removes bulk debris: leftover lumber scraps, drywall chunks, packaging materials, and heavy dust deposits. Sweep and shovel debris into contractor bags. Use your HEPA vacuum on floors and surfaces to pull up the heaviest accumulation. Do not mop yet. Wet mopping over heavy dust creates a paste that is far harder to remove than dry debris.
-
Light clean. Once bulk debris is gone, focus on detailed dust reduction. Wipe walls, trim, baseboards, and window sills with damp microfiber cloths. Vacuum all surfaces again, including inside cabinets and drawers, which are commonly overlooked but collect significant settled dust. Clean light fixtures, ceiling fans, and vent covers. This phase reduces the dust load enough to make the final clean meaningful.
-
Final clean. This is the inspection-ready phase. Waiting 24 to 48 hours after the light clean allows remaining airborne particles to settle before you do your final wipe-down. Remove all stickers, adhesive residue, and protective films from windows, appliances, and fixtures. A failure to address residues gives the space an unfinished appearance even when the dust itself is gone. Mop hard floors, clean glass, and do a full walkthrough with a flashlight.
The 24 to 48 hour wait between the light clean and final clean is the step most homeowners skip. It is also the step that determines whether you clean once or twice.
How to clean post-construction dust step-by-step {#steps}
This sequence is the core of any effective post-renovation cleaning guide. Follow it in order. Cleaning floors first causes immediate recontamination when dust from walls and ceilings falls onto surfaces you just cleaned.
-
Seal off completed zones. Close doors to rooms not being cleaned. This prevents dust migration into clean areas of your home in West LA, Culver City, or wherever your renovation took place.
-
Clean ceilings and light fixtures first. Use an electrostatic duster on ceiling fans and a microfiber cloth on light fixtures. Vacuum ceiling corners and crown molding with a brush attachment.
-
Move to walls and trim. Wipe walls top to bottom with a damp microfiber cloth. Pay close attention to baseboards, door frames, and window sills where dust accumulates in thick layers.
-
Vacuum all surfaces with a HEPA vacuum. Work from the top of each wall down to the floor. Use the brush attachment on textured surfaces and the crevice tool along edges and corners.
-
Clean vents and HVAC grilles. Remove vent covers and wash them separately. Vacuum the duct opening as far as the hose reaches. Construction dust inside HVAC systems circulates through your entire home every time the system runs.
-
Wipe cabinets inside and out. Cabinet interiors collect dust that falls through gaps during construction. Vacuum first, then wipe with a damp cloth.
-
Address adhesive residue and protective films. Use Goo Gone or a dedicated adhesive remover on window glass, appliance surfaces, and hardware. The Sabezon GlassPilot™ Smart Window Cleaner works well for streak-free glass after film removal.
-
Vacuum floors thoroughly before mopping. Run the HEPA vacuum over all hard floors and carpets before any wet cleaning. Mopping over unvacuumed dust creates a gritty residue.
-
Mop hard floors with a pH-neutral cleaner. Use a damp mop, not a soaking wet one. Excess water can damage new hardwood or grout.
-
Final walkthrough with a flashlight. Angling a flashlight across surfaces reveals fine dust and streaks that overhead lighting misses entirely. This step catches what your eyes cannot see under normal conditions.
Pro Tip: Change your HVAC filter immediately after completing the rough clean, and again after the final clean. Construction dust loads filters faster than normal household use, and a clogged filter recirculates particles you just worked to remove.
Dry dusting vs. damp wiping comparison:
| Method | What it does to dust | Best use case |
|---|---|---|
| Dry dusting | Launches particles into the air; dust resettles | Never recommended for post-construction |
| Damp microfiber wipe | Traps and removes particles on contact | All wall, trim, and surface cleaning |
| HEPA vacuuming | Captures particles without releasing them | Floors, vents, textured surfaces, upholstery |
| Wet mopping | Removes fine residue from hard floors | Final step only, after thorough vacuuming |
Dry dusting spreads fine dust into the air and allows it to resettle on surfaces you already cleaned. This is the single most common mistake homeowners make during post-construction cleanup.
How to troubleshoot common challenges when cleaning construction dust {#challenges}
Even with the right tools and sequence, specific problems come up repeatedly. Here is how to handle the ones that stop most people cold.
Dust keeps reappearing after cleaning. This happens when HVAC systems are running during or after cleaning. Turn off your HVAC system before you start and leave it off until the final clean is complete. Change the filter before turning it back on.
Drywall dust turns into a paste when wet. You vacuumed first, but the surface still smears when you wipe it. This means the dust layer was thicker than it appeared. Vacuum again with the brush attachment, then wipe with a barely damp cloth rather than a wet one.
Adhesive residue will not budge. Goo Gone works on most construction adhesives, but some require a longer dwell time. Apply the product, wait five minutes, then wipe. Never use abrasive scrubbers on new finishes, painted surfaces, or sealed stone.
Hidden dust reservoirs you are probably missing:
- Inside window tracks and sliding door channels
- Behind and underneath new appliances
- Inside electrical outlet boxes (vacuum carefully with the power off)
- On top of door frames and interior window ledges
- Inside bathroom exhaust fan housings
“Standard construction cleanup often leaves behind fine dust that only specialized, phased cleaning and equipment can fully remove.” Renovation Cleaning Guide, Servpro
When to call a professional. If your renovation involved silica-heavy materials like concrete cutting or tile grinding, the dust load exceeds what most homeowners can safely manage without industrial equipment. Contractors typically provide only a broom-swept clean, which means the fine particulate work falls entirely to you or a professional cleaning service. For large-scale projects in Brentwood, Pacific Palisades, or Manhattan Beach, professional post-construction cleaning is the faster and safer path to a move-in ready home. You can learn more about what post-construction cleaning covers before deciding whether to DIY or hire out.
Key Takeaways {#takeaways}
Effective post-construction dust removal requires HEPA-filter equipment, a strict top-to-bottom sequence, and a 24 to 48 hour wait between the light clean and final clean to allow airborne particles to settle completely.
| Point | Details |
|---|---|
| Use HEPA vacuums only | Standard vacuums recirculate fine particles; HEPA filters capture 99.97% down to 0.3 microns. |
| Follow the three-phase process | Rough, light, and final clean in sequence prevents recontamination and rework. |
| Wait 24 to 48 hours before final clean | Airborne dust must settle before the final wipe-down or you will clean the same surfaces twice. |
| Never dry dust | Dry dusting launches particles into the air; always use damp microfiber cloths or HEPA vacuuming. |
| Check hidden reservoirs | Vents, cabinet interiors, window tracks, and HVAC filters hold dust that causes recontamination. |
Why patience is the real skill in post-construction cleaning {#perspective}
By L.K.
After working with homeowners across Los Angeles, from Koreatown to Redondo Beach, the pattern I see most often is this: people rush the final clean. They finish the rough sweep, do a quick wipe-down, and assume the space is ready. Two days later, a fine gray film has reappeared on every surface, and they are back to square one.
The phased approach to cleaning is not a formality. It reflects how construction dust actually behaves. Drywall dust in particular is so fine and light that it stays suspended in the air for 24 to 48 hours after any disturbance. Cleaning too early means you are wiping surfaces that will be recoated with settling particles within hours.
The other thing I have learned is that tool quality matters more than effort. I have watched homeowners spend an entire Saturday cleaning with a standard shop vac and a roll of paper towels, only to achieve a result that a professional with a HEPA vacuum and microfiber system could match in two hours. The investment in the right equipment, whether you buy it or hire a team that already has it, pays off immediately in time and in air quality.
The final detail that separates a satisfying result from a frustrating one is the flashlight walkthrough. Most people skip it because the room looks clean under normal lighting. That flashlight reveals the truth. Attention to high-touch points and fine surface details is what transforms a construction zone into a home you actually want to live in. Do not skip it.
— Lyndsey
Let Themaidsociety handle your post-construction cleanup in LA {#promo}
Post-construction cleaning is one of the most demanding residential cleaning jobs there is. Themaidsociety serves homeowners and renters across Los Angeles, Beverly Hills, West Hollywood, Hawthorne, El Segundo, Long Beach, and the surrounding Southern California area with professional post-construction cleaning services built around HEPA filtration, phased cleaning protocols, and detail-oriented final inspections.
You do not need to spend a weekend breathing construction dust or risk missing the hidden reservoirs that cause recontamination. Our vetted, trained team brings the right equipment and the right process to every job. Whether you are moving into a newly built home, finishing a kitchen remodel, or preparing a rental unit for tenants, we get your space move-in ready faster and safer than DIY methods allow. Explore our move-in cleaning services or book directly through our services page.
FAQ {#faq}
How long does post-construction dust take to settle?
Fine construction dust, especially from drywall and silica, remains airborne for 24 to 48 hours after work is completed. Waiting for this settling period before your final clean prevents you from wiping surfaces that will be recoated within hours.
Can I use a regular vacuum to clean construction dust?
A regular vacuum is not effective for post-construction dust removal. Standard vacuums lack the filtration to capture particles below 0.3 microns and exhaust fine dust back into the air, making the problem worse rather than better.
What is the correct order to clean after construction?
Clean from top to bottom: ceilings and fixtures first, then walls and trim, then floors last. Cleaning floors first causes immediate recontamination when dust from higher surfaces falls down after you have already mopped.
Do I need to clean my HVAC after construction?
Yes. Construction dust enters HVAC ducts and circulates through your home every time the system runs. Vacuum duct openings, clean or replace vent covers, and change your HVAC filter immediately after the rough clean and again after the final clean.
When should I hire a professional instead of cleaning myself?
Hire a professional when the renovation involved silica-heavy materials like concrete or tile cutting, when the square footage is large, or when you need the space ready quickly. You can review what a professional clean covers to decide what fits your situation.
Recommended articles
- What is post-construction cleaning: guide for LA homeowners
- Why post-construction cleaning protects your LA home
- Post-construction cleaning: your move-in ready guide
- Post-Construction Cleaning for Landlords: Ready Units Fast
Looking to grow your home services business online? ConvertLabs helps service companies convert more website visitors into booked clients.
"“json
## Recommended

- [Dust Removal Methods for Contractors: 2026 Field Guide](https://themaidsociety.com/blog/dust-removal-methods-for-contractors-2026-field-guide)
- [Detailed cleaning guide for builders: post-construction success](https://themaidsociety.com/detailed-cleaning-guide-builders-post-construction)
- [Post Construction Cleaning Guide for Ready-to-Rent Homes](https://themaidsociety.com/post-construction-cleaning-guide-ready-to-rent)
- [Deep Cleaning Process for Builders: Ensure Project Perfection](https://themaidsociety.com/deep-cleaning-process-for-builders)Get Cleaning Tips & Exclusive Offers
Join our community for time-saving hacks and special discounts delivered to your inbox.