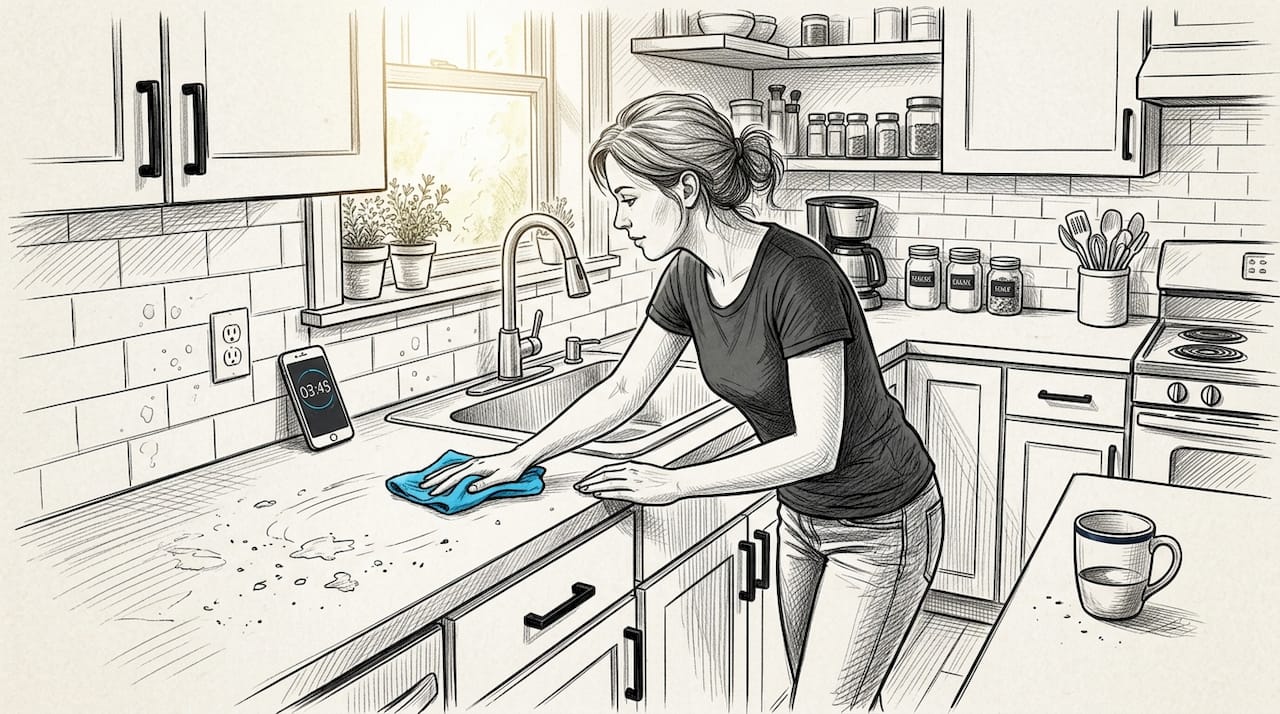
You finish cooking a big family dinner, set down the last plate, and then turn around. Grease splattered across the stovetop. Crumbs on the counter. A sink full of dishes. Sound familiar? For many Los Angeles homeowners, the post-meal kitchen mess feels endless, especially when there is no clear plan to tackle it. A structured, step-by-step kitchen cleaning routine does more than keep your space looking good. It protects your family from foodborne illness, saves you real time, and makes the whole process far less stressful. This guide walks you through everything, from gathering supplies to building lasting habits.
Table of Contents
- What you need before you start: Supplies and setup
- Step-by-step kitchen cleaning routine
- Tackling tough kitchen problems: Grease, stains, and odors
- Maintaining your kitchen: Daily, weekly, and monthly checklists
- Why most kitchen cleaning routines fail—and what actually works
- Need more help? Trusted cleaning services in Los Angeles
- Frequently asked questions
Key Takeaways
| Point | Details |
|---|---|
| Gather supplies first | Organizing all your cleaning tools and products before starting saves time and hassle during the process. |
| Clean top to bottom | Begin cleaning higher surfaces and work down to avoid having to redo areas and maximize efficiency. |
| Follow a routine | A simple daily, weekly, and monthly schedule keeps your kitchen clean with minimal effort. |
| Target tough spots | Special techniques for grease, stains, and odors make a big difference in maintaining a spotless kitchen. |
| Stay flexible | Adapt your routine to fit your lifestyle for long-lasting results and less cleaning burnout. |
What you need before you start: Supplies and setup
Before you scrub a single surface, getting organized is the smartest move you can make. Running back and forth to find a sponge or realizing mid-clean that you are out of disinfectant kills your momentum fast. Laying everything out in advance turns a chaotic chore into a smooth, focused process.
Here is what you need on hand:
- All-purpose surface cleaner for countertops and cabinet fronts
- Degreaser for stovetops, range hoods, and backsplashes
- Disinfectant spray or wipes for high-touch areas like handles and faucets
- Microfiber cloths (at least four, color-coded by zone)
- Non-scratch sponges for sinks and appliances
- Rubber gloves to protect your hands from chemicals
- Trash bags in two sizes for quick bin swaps
- Broom, dustpan, and mop for floors
- Bucket for mopping solution
Before any chemical touches a surface, the CDC recommends a clean-then-sanitize approach to prevent foodborne illness. That means removing visible dirt and food residue first, then applying a disinfectant. Skipping the cleaning step means your sanitizer is fighting through grime instead of actually killing germs.
For your pre-clean setup, do these three things before you spray anything:
- Declutter countertops and move small appliances aside
- Empty the trash and replace the liner
- Open a window or turn on the range hood fan for ventilation, especially if you are using chemical cleaners
You can also find a helpful breakdown of cleaning supplies for kitchens that covers natural alternatives if you prefer to go low-chemical.
| Supply | Purpose |
|---|---|
| Degreaser | Cuts through cooking oil and grease |
| Disinfectant | Kills bacteria on high-touch surfaces |
| Microfiber cloths | Trap particles without spreading them |
| Rubber gloves | Protect skin from harsh cleaners |
| Mop and bucket | Sanitize tile or hardwood floors |
Pro Tip: Use separate cloths or sponges for food-prep areas versus other surfaces like cabinet handles and trash bins. This simple habit prevents cross-contamination and keeps your counters genuinely safe for food.
Step-by-step kitchen cleaning routine
With your gear ready, follow this step-by-step sequence for best results. Order matters more than most people realize, and the right sequence can make a noticeable difference in both time and results.
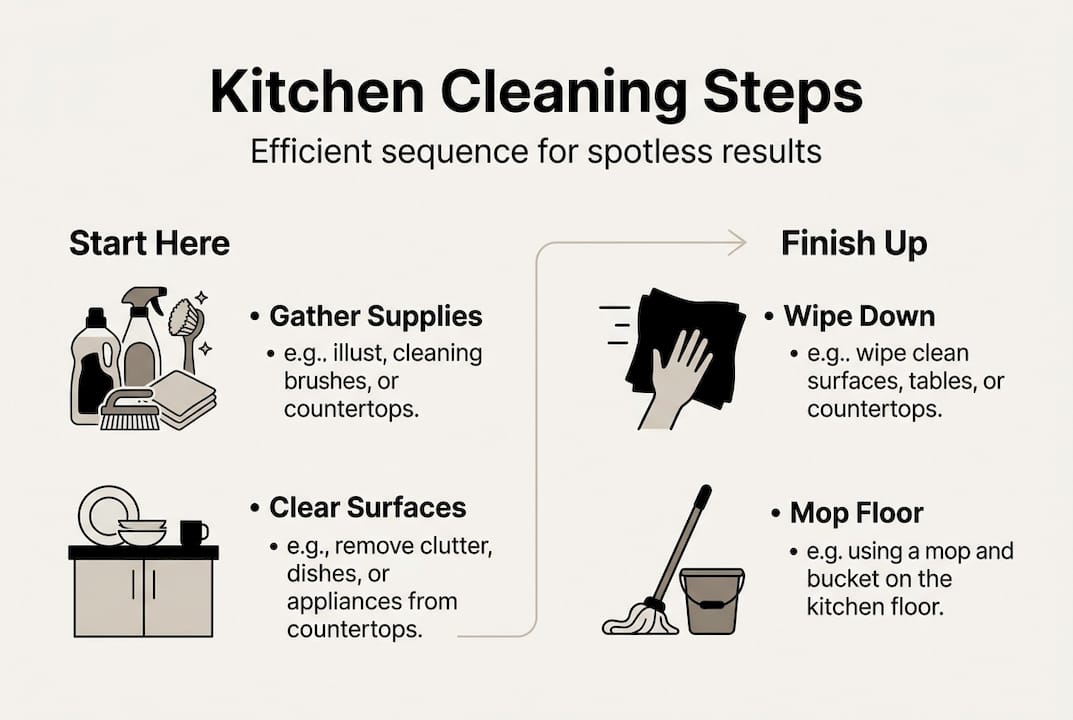
The single most important principle here is top-to-bottom cleaning. Working from high surfaces down to the floor means dust, crumbs, and drips fall onto areas you have not cleaned yet. This saves 30 to 40% of your time by eliminating the need to re-clean lower surfaces. Most people start with the sink or counters out of habit, then wonder why the floor still looks dirty after sweeping.
Follow this order every time:
- Light fixtures and ceiling fans above the kitchen: wipe with a dry microfiber cloth
- Upper cabinet fronts and tops: spray with all-purpose cleaner, wipe down
- Countertops: clear, spray, wipe, then sanitize with disinfectant
- Appliances (microwave exterior, fridge front, stovetop): use degreaser on the stove, all-purpose on others
- Sink: scrub basin, faucet, and handles, then sanitize
- Lower cabinet fronts: wipe with damp cloth
- Floors: sweep or vacuum first, then mop
The CDC emphasizes that cleaning before sanitizing is critical on every surface, not just counters. This applies to your sink, stovetop, and fridge handles too. For anyone doing a more thorough session, the deep cleaning process used in professional settings follows the same logic but goes further into appliance interiors and grout lines.
| Method | Typical time | Re-cleaning needed? |
|---|---|---|
| Random order | 60 to 75 minutes | Often yes |
| Top-to-bottom | 35 to 50 minutes | Rarely |
Pro Tip: Keep a printed or phone-saved checklist of this exact order on your fridge. After two or three uses, it becomes automatic and you will stop second-guessing where to start.
Tackling tough kitchen problems: Grease, stains, and odors
Even with a solid routine, some problems need special attention. Here is how to tackle them without damaging your surfaces or wasting time on products that do not work.
Grease buildup is the most common complaint in LA kitchens, especially around stovetops and range hoods. Apply a degreaser and let it sit for at least two minutes before wiping. This dwell time (the period the cleaner stays wet on the surface) is what breaks down the grease molecules. Wiping immediately is the number one reason people think their degreaser is not working.
Counter and sink stains respond well to a paste made from baking soda and a small amount of dish soap. Apply it, let it sit for five minutes, then scrub gently with a non-scratch sponge. For tougher stains on porcelain sinks, a small amount of hydrogen peroxide works without scratching.
Persistent odors are often hiding in the drain, trash bin, or sponge holder. Pour a mix of baking soda and white vinegar down the drain, let it fizz for ten minutes, then flush with hot water. Replace sponges every one to two weeks since they harbor bacteria even after rinsing.
Here are the key safety rules to follow:
- Never mix ammonia-based cleaners with bleach. The combination creates toxic chloramine fumes.
- Always read labels before mixing any two products
- Ventilate the room whenever using strong chemical cleaners
Important: Up to 80% of foodborne illness in the home is linked to kitchen cross-contamination. Sanitizing after every raw meat prep session is not optional.
For more time-saving strategies, the kitchen cleaning time-savers guide is especially useful for busy LA households juggling work and family.
Maintaining your kitchen: Daily, weekly, and monthly checklists
Once the hardest spots are clean, keeping the kitchen fresh gets much easier with a smart routine. The key is matching the task to the right frequency so nothing piles up into a big job.
Daily tasks (5 to 10 minutes):
- Wipe down countertops and stovetop after each meal
- Wash, dry, and put away dishes
- Empty the trash if it is full or smells
- Sweep up crumbs from the floor
- Rinse the sink and wipe the faucet handles
Weekly tasks (20 to 30 minutes):
- Mop the kitchen floor
- Wipe down the exterior of all appliances
- Clean the inside of the microwave
- Sanitize the sink basin and drain
- Wipe cabinet fronts near the stove
Monthly tasks (45 to 60 minutes):
- Deep clean the oven interior
- Organize and wipe down cabinet and pantry shelves
- Clean the refrigerator interior and discard expired food
- Degrease the range hood filter
- Sanitize trash bins inside and out
The CDC guidance on sanitizing high-touch surfaces applies especially to daily tasks since handles, faucets, and light switches are touched constantly. For printable templates and ideas tailored to LA homes, the cleaning schedule examples page has ready-to-use formats.
Pro Tip: Set a recurring phone reminder for your monthly deep clean tasks. Label it something specific like “Oven and fridge day” so you know exactly what to do when the notification pops up.
Why most kitchen cleaning routines fail—and what actually works
Here is something most cleaning guides will not tell you: the problem is rarely the method. Most homeowners in Los Angeles already know roughly what needs to be done. The real reason routines fall apart is that they are built for an ideal version of life, not actual life.
A rigid 90-minute Saturday cleaning session sounds great until one Saturday gets busy, then two, and suddenly the kitchen is three weeks behind. What actually works is building flexibility into the system. Ten-minute micro-tasks done consistently beat a perfect deep clean done occasionally. Wiping the stove right after cooking takes 60 seconds. Waiting until it is caked with grease takes 15 minutes.
Another underrated factor is family buy-in. In households where one person carries all the cleaning responsibility, burnout is almost guaranteed. Even small contributions from other household members, like rinsing their own dishes or wiping the counter after making a snack, compound into real time savings.
The most effective advice we give homeowners is to embrace “good enough” cleaning. A kitchen that is wiped down daily and deep cleaned monthly is healthier and more functional than one that is immaculate twice a year. Consistency beats perfection every time. For households going through a transition like moving, the move-out cleaning strategies guide shows how this mindset applies even to high-stakes cleaning situations.
Need more help? Trusted cleaning services in Los Angeles
Sometimes the routine is solid but life gets in the way. Maybe you are prepping for guests, recovering from a renovation, or simply need a reset after a busy stretch. That is exactly where a professional team makes a real difference.

At The Maid Society, we offer cleaning services in Los Angeles that cover everything from standard maintenance visits to full kitchen deep cleans. Our team is trained, vetted, and focused on the kind of detail work that is easy to skip when you are short on time. If you have ever wondered about the difference between janitorial and residential cleaning, our residential approach is built specifically for homes and families. We also believe that the details matter in every visit, not just the first one. Reach out for a quote and see how we can help you maintain a kitchen you are proud of.
Frequently asked questions
What is the best order to clean a kitchen step by step?
Start from the top, meaning light fixtures and cabinets, and work your way down to the floors. This top-to-bottom method saves 30 to 40% of your cleaning time by preventing re-cleaning lower surfaces.
How often should I sanitize my kitchen surfaces?
Sanitize high-touch kitchen surfaces every day, and always immediately after handling raw meat or cleaning up spills. The CDC recommends cleaning first, then sanitizing for the best protection against foodborne illness.
What should I avoid mixing when cleaning my kitchen?
Never mix ammonia-based cleaners with bleach. Combining these two creates toxic chloramine fumes that are dangerous to breathe, even in a ventilated space.
Do eco-friendly cleaners work for tough kitchen stains?
Eco-friendly cleaners work well for everyday messes and light stains, especially when paired with thorough scrubbing. For heavy grease or deep-set stains, a specialty degreaser or professional cleaning may get better results.
What’s a quick daily checklist for keeping my kitchen clean?
Wipe down counters and the stovetop, wash and put away dishes, take out the trash if needed, and sweep up crumbs. These five tasks take under ten minutes and keep your kitchen in good shape between deeper cleans.
Recommended
- How to Clean Busy Home Naturally: A Step-by-Step Guide
- Effective Bathroom Cleaning Process for a Pristine Home
- 6 Essential Steps for a Smart Seasonal Cleaning Checklist
- How to Handle Renovation Cleanup for a Spotless Home
- Window cleaning procedure: pro-level results at home
- 7 Essential Dishwasher Care Tips for Homeowners
Get Cleaning Tips & Exclusive Offers
Join our community for time-saving hacks and special discounts delivered to your inbox.